Multiple Database using Play Framework and Scala
Some time ago was asked to me to change the database connection depending on the logged user.
This requirement looks weird but it’s needed due the fact of our clients want to connect on their own database instance.
In this post I’m going to show you how I solved it sharing the same web application with a specific database instance based on the logged user.
We’re going to use Play Framework, Scala, Slick and MySQL.
Step 1: Play application
First of all, we’ll create a new Play Scala application. I like to use TypeSafe Activator to create a new Scala projects.
To do that type on your terminal:
activator new
It’ll show the output below:
Fetching the latest list of templates...
Browse the list of templates: http://typesafe.com/activator/templates
Choose from these featured templates or enter a template name:
1) minimal-akka-java-seed
2) minimal-akka-scala-seed
3) minimal-java
4) minimal-scala
5) play-java
6) play-scala
(hit tab to see a list of all templates)
Choose number 6 to create a Play Scala project and give it a name, e.g multidb:
> 6
Enter a name for your application (just press enter for 'play-scala')
> multidb
OK, application "multidb" is being created using the "play-scala" template.
To run "multidb" from the command line, "cd multidb" then:
/Users/gbmetzner/Documents/Development/projects/blogs/multidb/activator run
To run the test for "multidb" from the command line, "cd multidb" then:
/Users/gbmetzner/Documents/Development/projects/blogs/multidb/activator test
To run the Activator UI for "multidb" from the command line, "cd multidb" then:
/Users/gbmetzner/Documents/Development/projects/blogs/multidb/activator ui
Our Play application is done.
Step 2: Database
After the Play application, we’re going to configure our database.
Firstly, we need to configure two schemas on MySQL, something like this:
CREATE SCHEMA `user1` DEFAULT CHARACTER SET utf8 ;and
CREATE SCHEMA `user2` DEFAULT CHARACTER SET utf8 ;We need to create tables, so, run the code below (each one in their schema):
CREATE TABLE `user1`.`user` (
`id` INT NOT NULL AUTO_INCREMENT,
`name` VARCHAR(45) NOT NULL,
PRIMARY KEY (`id`));

CREATE TABLE `user2`.`user` (
`id` INT NOT NULL AUTO_INCREMENT,
`name` VARCHAR(45) NOT NULL,
PRIMARY KEY (`id`));
Our database is done.
It’s time to configure the db connection on our Play application.
Open the application.conf file located on /conf/application.conf and type the following to configure the data sources on Play:
db.user1.driver = com.mysql.jdbc.Driver
db.user1.url = "jdbc:mysql://localhost:3306/user1"
db.user1.user = root
db.user1.password = "root"
and
db.user2.driver = com.mysql.jdbc.Driver
db.user2.url = "jdbc:mysql://localhost:3306/user2"
db.user2.user = root
db.user2.password = "root"
By default Play uses BoneCP as connection pool library. It’s possible to change this library but to do that you need to create a Play Plugin. We’ll talk about it later
Step 3: Slick
Configuring Slick is quite simple, just a few lines of code.
We need to configure our build.sbt to add Slick and MySQL connector, as following:
libraryDependencies ++= Seq(
  jdbc,
  "com.typesafe.slick" %% "slick" % "latest.integration",
  "mysql" % "mysql-connector-java" % "latest.integration"
)Note: Do not use “latest.integration” on production. I like to use it to keep my projects up-to-date while it’s in dev mode.
After that, we need to update our project to download these libraries. To do that go to the root directory of our project and type activator and right after type update as following:
Gustavos-MacBook-Pro:multidb gbmetzner$ activator
Java HotSpot(TM) 64-Bit Server VM warning: ignoring option MaxPermSize=1G; support was removed in 8.0
[info] Loading global plugins from /Users/gbmetzner/.sbt/0.13/plugins
[info] Updating {file:/Users/gbmetzner/.sbt/0.13/plugins/}global-plugins...
[info] Resolving org.fusesource.jansi#jansi;1.4 ...
[info] Done updating.
[info] Loading project definition from /Users/gbmetzner/Documents/Development/projects/scala/multidb/project
[info] Updating {file:/Users/gbmetzner/Documents/Development/projects/scala/multidb/project/}multidb-build...
[info] Resolving org.fusesource.jansi#jansi;1.4 ...
[info] Done updating.
[info] Set current project to multidb (in build file:/Users/gbmetzner/Documents/Development/projects/scala/multidb/)
[multidb] $ update
[info] Updating {file:/Users/gbmetzner/Documents/Development/projects/scala/multidb/}root...
[info] Resolving jline#jline;2.12 ...
[info] Done updating.
[success] Total time: 6 s, completed 03/01/2015 18:26:52
[multidb] $
Let’s create our model. It’ll be very simple, a User class with id and name:
package models

import scala.slick.driver.MySQLDriver.simple._
import scala.slick.lifted.ProvenShape

case class User(id: Option[Int] = None, name: String)

class UserTable(tag: Tag) extends Table[User](tag, "user") {
  def id: Column[Option[Int]] = column[Option[Int]]("id", O.PrimaryKey, O.AutoInc)

  def name: Column[String] = column[String]("name", O.NotNull)

  override def * : ProvenShape[User] = (id, name) <>(User.tupled, User.unapply)
}
This UserTable class is needed to allow us access a lot of useful functions of Slick. I am going to explain Slick in another post.
Now, let’s create a simple object to represent our repository, which receives a Slick Session implicitly:
package repositories

import models.{User, UserTable}

import scala.slick.driver.MySQLDriver.simple._
import scala.slick.lifted.TableQuery

object UserRepository {
  private val userTable = TableQuery[UserTable]

  def insert(user: User)(implicit s: Session): Unit = userTable += user
}
Step 4: Sessions and transactions
Let’s create our service. It’s necessary to open sessions and transations and pass it implicitly to our Repository. Again we’re doing it simple just creating an object:
package services

import models.User
import play.api.Play.current
import play.api.db._
import repositories.UserRepository

import scala.slick.driver.MySQLDriver.simple._

object UserService {

  case class DSLocator(dsName: String) {
    val db = Database.forDataSource(DB getDataSource dsName)
  }

  def insert(user: User)(dsName: String): Unit = DSLocator(dsName).db.withTransaction {
    implicit session =>
      UserRepository insert user
  }
}
This case class DSLocator will be used to get the right DataSource from Play. That way we’re able to change the datasource just passing a different dsName configured in application.conf (user1 or user2).
Step 5: Controllers and routes
We’re almost done. Let’s create a Controller called UserController as below:
package controllers

import models.User
import play.api.mvc.{Action, Controller}
import services.UserService

object UserController extends Controller {

  def save(name: String) = Action {

      UserService.insert(User(None, name))(name)

      Ok("saved")
  }
}
For convenience, let’s use the name for both User and DSName.
Now we need to configure our routes file as below, to allow Play receives POST requests:
GET         /                    controllers.Application.index
POST        /user/:user          controllers.UserController.save(user: String)

# Map static resources from the /public folder to the /assets URL path
GET         /assets/*file        controllers.Assets.at(path="/public", file)
Step 6: Testing
It’s time to test our application, so, type run on your terminal to start Play.
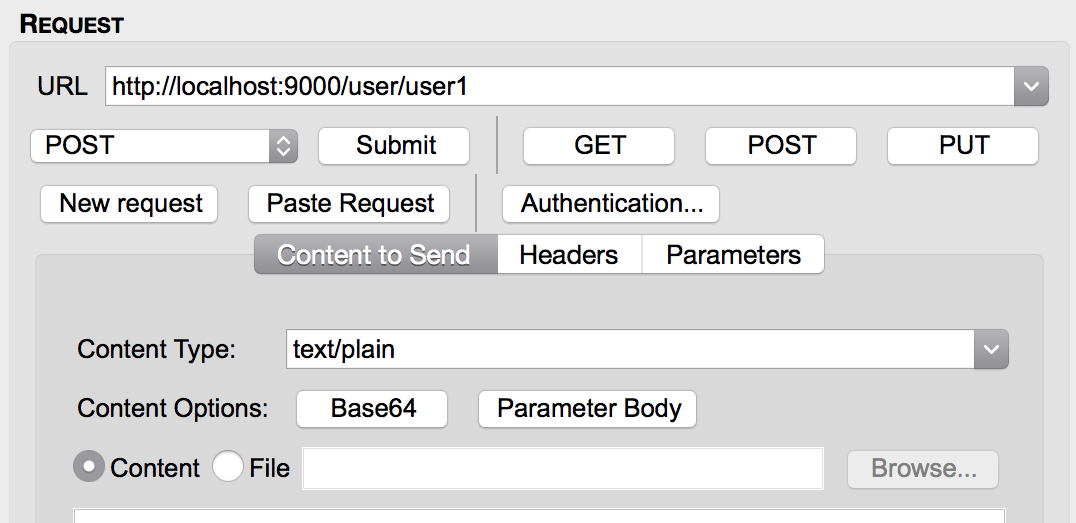
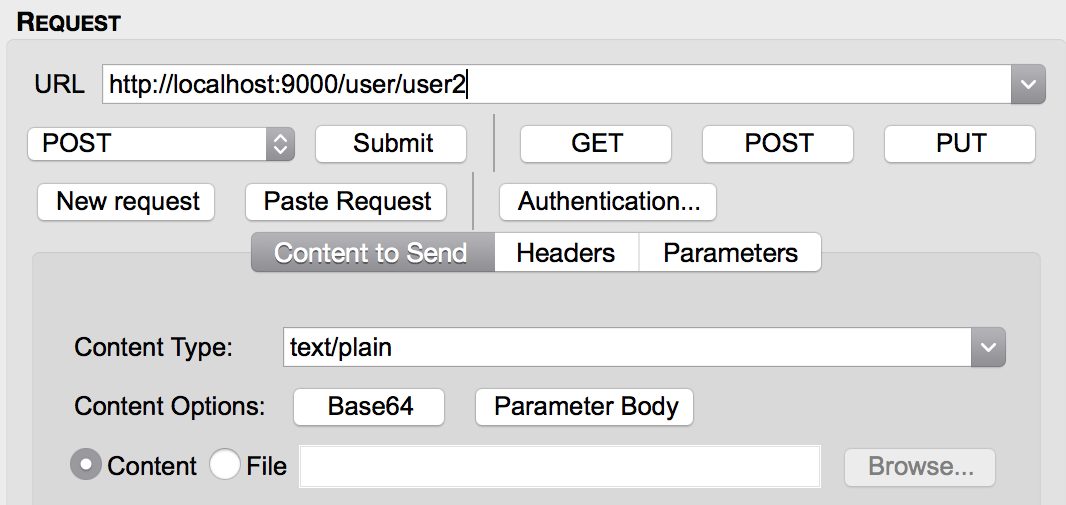
I’ve installed HttpRequester on Firefox and filled up the fields to test the application:
This one for user1:
 And this one for user2:

We can see the result of our test checking the user database on both schemas user1 and user2, as below:
user1:
 user2:

As you can see, each request was inserted on their own database.
How it works
What allow us change the database connection is the Play DBApi.scala.
This api creates a cache of connection pools when Play starts.
So, if you configure your application.conf with db.somename.attribute play will look for a connection called somename in its cache and won’t create another connection pool.
You can check out this source code here
That’s all folks!
I hope I could help.
If you have questions let me know.